Table of Contents
Git is an open-source version control system. It was designed and developed by Linus Torvalds (creator of the Linux kernel) and is the most popular version control system to date. Let’s dive into the details.
About Version Control
Put simply, Version Control is a system that records changes to a file or set of files over time so that you can recall specific versions later. In software development, software source code is used as the files being version controlled, though, in reality, you can do this with nearly any type of file on a computer. For example, a graphic or a web designer can use version control software to keep every past version of an image or a layout.
With very little overhead, using a Version Control System (VCS) enables you to:
- Revert a single, multiple, or all files back to any previously saved state
- Compare changes between different saved states
- See who introduced an issue and when
- Recover (accidentally) lost files
…and much more
Local Version Control Systems
Many people’s version-control method of choice is to copy files into another directory (perhaps a time-stamped directory, if they’re clever). This approach is very common because it is so simple, but it is also incredibly error-prone. To deal with this issue, programmers long ago developed local VCSs that had a simple local database that kept all the changes to files under revision control.
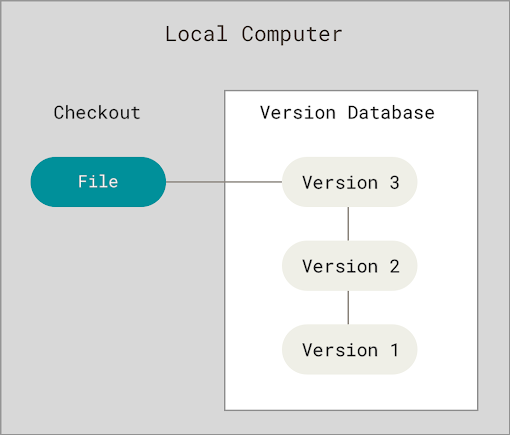
One of the most popular local VCS tools was a system called “Revision Control System” (RCS), which is still distributed with many computers today. RCS works by keeping patch sets (that is, the differences between files) in a special format on disk; it can then re-create what any file looked like at any point in time by adding up all the patches.
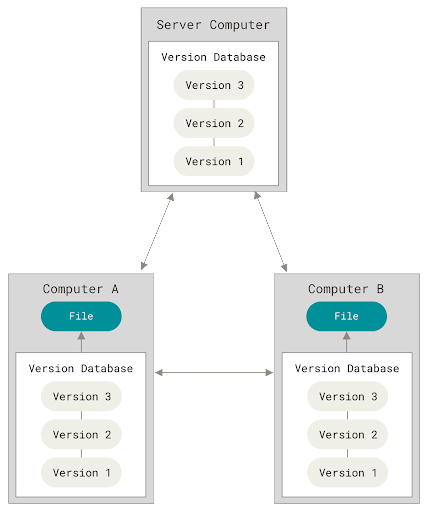
Centralized Version Control Systems
The next major issue that people encounter is that they need to collaborate with developers on other systems. To deal with this problem, Centralized Version Control Systems (CVCSs) was developed. These systems (such as CVS, Subversion, and Perforce) have a single server that contains all the versioned files, and a number of clients that check out files from that central place. For many years, this has been the standard for version control.

This setup offers many advantages, especially over local VCSs. For example, everyone knows to a certain degree what everyone else on the project is doing. Administrators have fine-grained control over who can do what, and it’s far easier to administer a CVCS than it is to deal with local databases on every client.
However, this setup also has some serious downsides. The most obvious is the single point of failure that the centralized server represents. If that server goes down for an hour, then during that hour nobody can collaborate at all or save versioned changes to anything they’re working on. If the hard disk the central database is on becomes corrupted, and proper backups haven’t been kept, you lose absolutely everything, the entire history of the project except whatever single snapshots people happen to have on their local machines. Local VCSs suffer from this same problem, whenever you have the entire history of the project in a single place, you risk losing everything.
Distributed Version Control Systems
This is where Distributed Version Control Systems (DVCSs) step in. In a DVCS (such as Git, Mercurial, Bazaar, or Darcs), clients don’t just check out the latest snapshot of the files; rather, they fully mirror the repository, including its full history. Thus, if any server dies, and these systems were collaborating via that server, any of the client repositories can be copied back up to the server to restore it. Every clone is really a full backup of all the data.
Furthermore, many of these systems deal pretty well with having several remote repositories they can work with, so you can collaborate with different groups of people in different ways simultaneously within the same project. This allows you to set up several types of workflows that aren’t possible in centralized systems, such as hierarchical models.
A Short History of Git
The Linux kernel is an open-source software project of a fairly large scope. During the early years of the Linux kernel maintenance, changes to the software were passed around as patches and archived files. In 2002, the Linux kernel project began using a proprietary DVCS called BitKeeper. In 2005, the relationship between the community that developed the Linux kernel and the commercial company that developed BitKeeper broke down. This prompted the Linux development community to develop their own tool based on some of the lessons they learned while using BitKeeper. Some of the goals of the new system were:
- Speed
- Simple design
- Strong support for non-linear development (thousands of parallel branches)
- Fully distributed
- Able to handle large projects like the Linux kernel efficiently (speed and data size)
Since its birth in 2005, Git has evolved and matured to be easy to use and yet retain these initial qualities. It’s amazingly fast, it’s very efficient with large projects, and it has an incredible branching system for non-linear development.
Installing Git
Linux
$ sudo apt install git-all
OR
$ sudo dnf install git-all
macOS
Follow this link.
Windows
Follow this link.
Looking for a Development Team?
Share the details of your request and we will provide you with a full-cycle team under one roof.
First-Time Git Setup
Git comes with a tool called git config that lets you get and set configuration variables that control all aspects of how Git looks and operates. The first thing you should do when you install Git is to set your user name and email address. This is important because every Git commit uses this information, and it’s immutably baked into the commits you start creating:
$ git config --global user.name "John Doe"
$ git config --global user.email “johndoe@example.com”
Instead of —global, which reads and writes the configuration for the current user, you can use –system to use the system-wide configuration which is for all users on the system, or you can also use –local to use a Git repository’s own individual configuration.
Also, set main as the default name for the initial branch:
$ git config --global init.defaultBranch main
To display all Git configuration keys:
$ git config --list
You can also check what Git thinks a specific key’s value is by typing git config <key>:
$ git config user.name
Getting Help
If you ever need help while using Git, there are three equivalent ways to get the comprehensive manual page (manpage) help for any of the Git commands:
$ git help <verb>
$ git <verb> --help
$ man git-<verb>
For example, you can get the manpage help for the git config command by running this:
$ git help config
In addition, if you don’t need the full-blown manpage help, but just need a quick refresher on the available options for a Git command, you can ask for the more concise “help” output with the -h option, as in:
$ git add -h
A note on Git and GitHub
Do not confuse Git and GitHub because they have similar names. Git is the actual Version Control System software that is downloaded to your machine locally. By typing any command starting with git in a command line, you are accessing this downloaded tool. Whereas, GitHub is a hosting and collaboration provider which saves you from setting up your own remote server for hosting your Git repositories. GitHub is web-based. You can optionally push your local Git repositories to GitHub to give its access to others and to allow others to collaborate with you on your project.
If you want to use Git, there is only one main implementation of it. But for hosting and collaboration, you have many options and there are many alternatives to GitHub like GitLab, BitBucket, SourceForge, etc. though GitHub is the most popular of all of these.
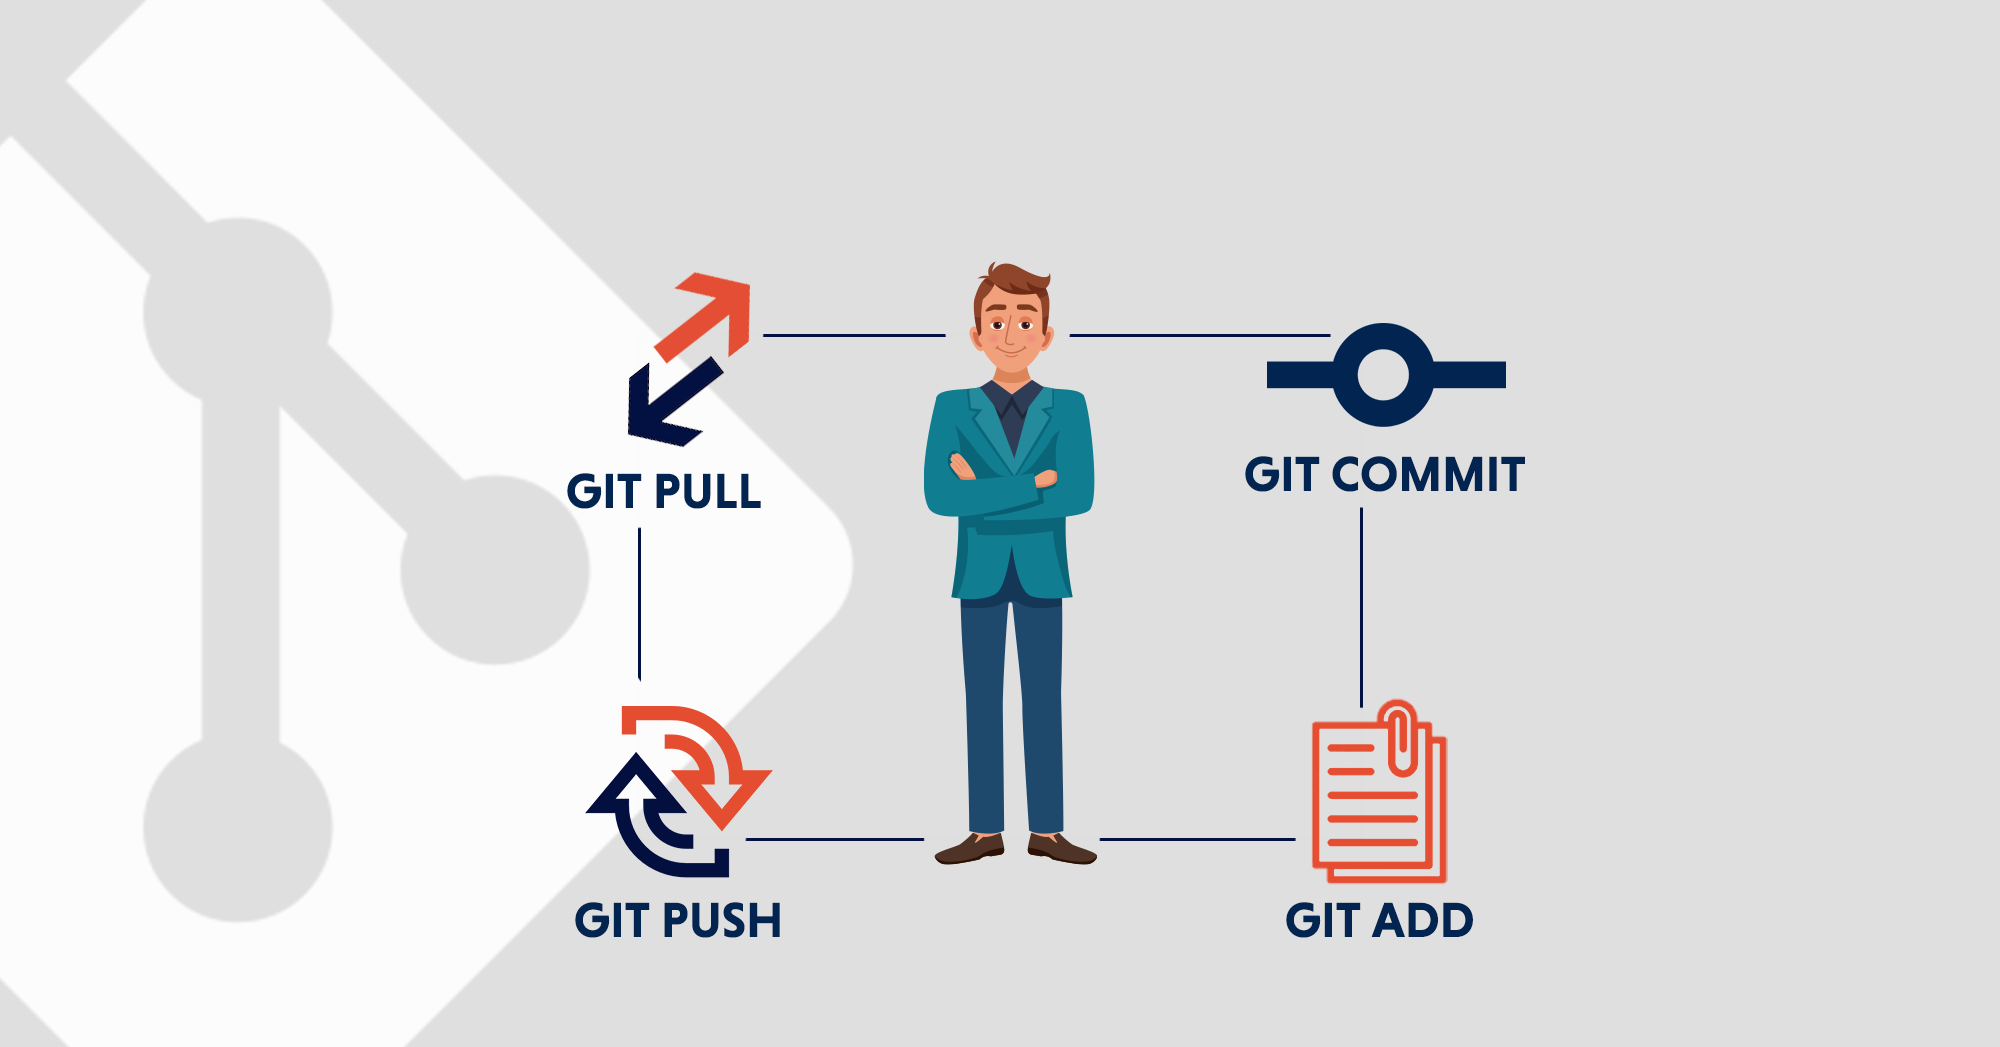
Repositories, Branches, & Commits
At the topmost level is the Git repository (also called repo). It is the location where all the project history i.e. every project snapshot is stored. To be precise, the repository is the .git folder inside the project folder which is created when you initialize a Git repository. This folder contains everything that has been done in your project. It contains all the versioning information about the project in a logical and efficient way.
Inside a repository are one or more branches. A branch can be thought of as a version of the project which temporarily (or permanently in some cases) went its own way. When a repository is initialized, there is only a single branch typically called master or main. Say, you want to add a feature to the project or fix a bug, what you can do is make a branch named feature-xyz which will essentially be a “copy” of some snapshot of the project. You will modify files in this “copy” i.e. branch and fix the bug or add the new feature, and then you will merge your changes back into the parent branch. This way other people can keep working off the parent branch and your work will all be separately contained until it’s finally ready to be included in the project which is called merging.
A branch consists of one or (usually) many commits. A commit is a snapshot of the project which can be, among other things, viewed or reverted back to later. The commits in a branch are the different browsable “stages” of a project. A commit is a “picture” of the project at any given point in time. We periodically take these “pictures” of our project so that we can recall them later.
Interacting with Git
Git does not come with a GUI. All Git interactions are performed at the command line though there are 3rd-party applications that provide a graphical user interface to Git with nice visualizations and insights about your repository. 95% of the help online in forums and the like is for the command line interface but most Git commands can be easily and intuitively translated to corresponding actions in your preferred Git GUI.
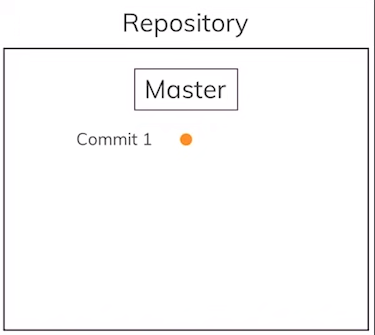
Making our first Git Repository and Commit
We will start by creating a new empty project folder and then making a new file with some content inside it (feel free to do all this with the text editor of your choice instead of the command line):
$ mkdir learning_git
$ cd learning_git
$ echo “hello” > index.html
Imagine that this point in time marks that we have done a significant amount of work on our project. Now if we want to go back to a previous version of our project, we simply can’t do it. Even if we were using a text editor’s or IDE’s “undo” (Ctrl+Z) functionality, we would be limited to the undo history temporarily available in the current instance of the opened file which is simply all lost when you close and reopen the file in the text editor or IDE.
You may say that we could have made periodic time-stamped or descriptively named backups of the project root folder, but this strategy is subject to many errors, and lacks many of the much-required features of a proper VCS and is thus never used in practice.
This is where Git comes in. Let’s see how we can initialize a Git repository and turn our project into a project managed by Git. The following command will make a new (hidden) .git directory in the current directory:
$ git init
Go and explore what’s inside this .git folder. It contains all the necessary folders and files Git needs to manage and monitor our project however this repository is “empty” for now meaning it does not contain any actual useful data about our project yet as indicated by the output of the git init command. We can get further information about this by running:
$ git status
It tells us that we have an untracked file. What this means is that even though Git knows we have a file in our project, we still have to explicitly tell Git that we want this specific file to be tracked i.e. managed by the VCS. Let’s tell git to track files:
$ git add index.html  # for tracking a single file
$ git add .  # for tracking all files in the project
We can say that index.html is also staged now or that index.html has also been added to the index (the name of the file has nothing to do with this, it’s a completely separate thing).
Rerunning the git status command confirms that index.html is now being tracked, it also tells us that we have some previously uncommitted changes which are ready to be committed. By running the following command, we will create our first commit, and thus the state of the files in the index at the time they were added to the index will be saved which can be browsed later:
$ git commit -m “A short descriptive message/label for the commit”
Giving a descriptive name/label to a commit is important because it helps later in identifying what changes were added to the commit. Don’t use gerunds or past tense when writing a commit message.
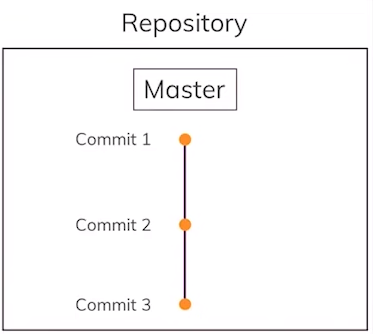
Because this was the first commit in the repository, a new branch with the name “main”/“master” was also automatically created with it as seen by running the following command:
$ git branch
The star/asterisk/* behind the branch name tells that it is the active branch. Because we only have a single branch right now, we only see one line as output starting with *.
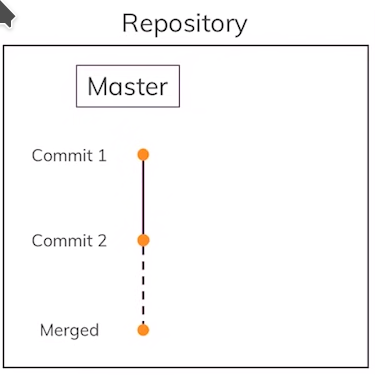
A visualization of what we have done up till now:
Second Commit and Beyond
Let’s modify and add changes to our project:
$ echo “hello again” >> index.html
This modification could be some new feature or a bug fix. We now stage the changes and commit them:
$ git add .
$ git commit -m “say hello one more time”
We have added a second commit to our “main”/”master” branch or taken a second snapshot of our project’s “main”/”master” copy.

Use the following command to see a commit history of the currently active branch:
$ git log
The latest commit will be the topmost, going down for older commits. Notice that the topmost commit has HEAD written around it. Each commit has a unique identifying hash which can be used to jump back and forth between different commits which looks something like this: 5759bdb86c124e72d99a6ce1185e50a1a6c2f53e, basically a long hexadecimal number.
Let’s create a third commit:
$ echo “hi Bob” >> index.html
$ git add .
$ git commit -m “say hi to Bob”
If we run the git log again, we will see that the HEAD will now be at our third commit. The HEAD is a user-friendly alias that points to the tip (latest commit) of a branch. You can view your repository’s heads in the path .git/refs/heads/. In this path, you will find one file for each branch, and the content in each file will be the commit ID of the tip (most recent commit) of that branch.
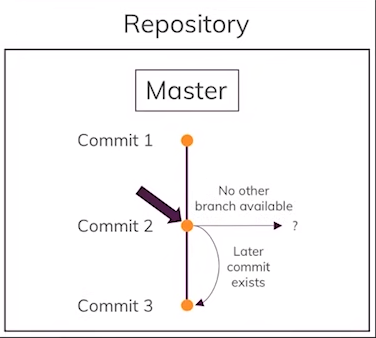
Viewing older Commits
If we want to check what a previously saved state of the project looked like, we can do so by going to a specific commit. Note the commit ID of the commit you want to go back to using the git log command and then run the following command:
$ git checkout <commit ID>
$ git checkout 5759bdb86c124e72d99a6ce1185e50a1a6c2f53e
If we check the contents of index.html now, we will see that they have changed back to what they were in the commit whose ID was used in the checkout command. Run git log again and you will see HEAD is also now at the commit whose ID was used. Essentially, it’s as if we traveled back in time to a past commit.
Note that this way of going back commits is only for viewing purposes. You cannot add changes from here and commit them, that would imply rewriting a future that has already happened.
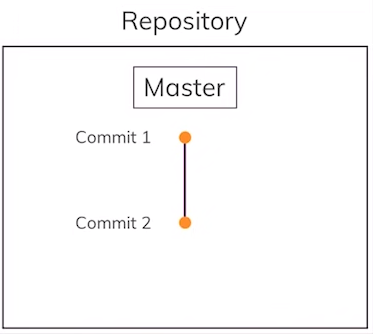
Going back while discarding newer Commits
If you want to discard some commits and go back to the commit before them, you will first need to go to the tip/head of the branch using its name which will be “main” or “master” in our case:
$ git checkout main
…and then run the following command:
$ git reset --hard <ID of the commit you want to go back to>
This will delete all the commits after the specified commit and all the work in those commits will be lost so be careful when using reset –hard. Check the contents of index.html and they will now be what they were in the specified commit. Also, try git status and git log.
Creating a new Branch
Let’s say your project was a website that was running well but you wanted to add some new features to it. You would probably want to work on this new feature in a separate and contained way because you wouldn’t want to crash or take offline the whole website while you develop and test this new feature.
Or let’s say you wanted to let someone else work on this new feature while you worked yourself on something else inside the project at the same time.
This will be where branches will come into play. In fact, Git’s Branching model is referred to as its killer feature because they are incredibly lightweight, making branching operations nearly instantaneous, and switching back and forth between branches is really fast.
You would create separate branches for separate lines of work of the project. Each branch is typically worked on by an individual. When the work in a branch is done, this work is merged into the parent branch either automatically or semi-automatically.
Let’s see Git’s branching in action. First, create a new branch from the currently active branch (“main”/“master” in our case) with the following command:
$ git checkout -b <new branch name>
$ git checkout -b feature
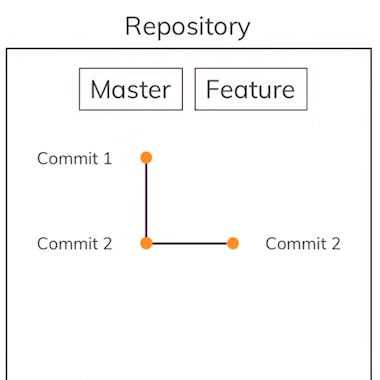
This will also activate the newly created branch which we can confirm using:
$ git branch
Running the git log now will show that all the commits from the “main”/”master” branch are present in the “feature” branch too and that the HEAD of both branches is common. This is because currently the “feature” branch is just a “copy” of the “main”/”master” branch and we haven’t made any new commits to it.
Because the “feature” branch and “main”/”master” branch are common up to the last commit of the “main”/”master” branch, we will say that the “feature” branch is based on the last commit “main”/”master” branch.
Working on the Feature Branch
Let’s work on the feature for which we created a separate branch. It may include creating a new file:
$ echo “some css” > style.css
…and it may include modifying a previous file:
$ echo “new feature” >> index.html
Commit the additions:
$ git add .
$ git commit -m “add new feature”

Run git log now and you will see that the HEAD of the “feature” branch is at this newly made commit.
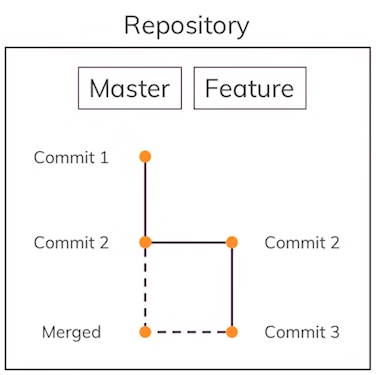
Merging Branches
Go back to the “main”/”master” branch:
$ git checkout main
Notice that the style.css and the additions to index.html are gone. This is because those changes were only in the “feature” branch. The “main” branch was left intact.
To merge the “feature” branch into the currently active branch (“main” in our case), run:
$ git merge feature
The merge will be successful because there were no merge conflicts. The work from the “feature” branch will now appear in the “main” branch. Read more.
What are Merge Conflicts?
Imagine we are at the point just before we did the merge above:
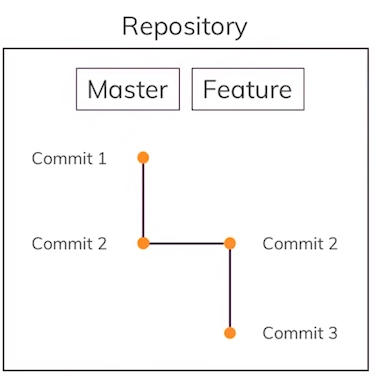
Now let’s say we change the line hello again in the index.html file to XYZ in the “main” branch and make another commit to our “main” branch. Then we also change the same line hello again in the index.html file to ABC in the “feature” branch and make another commit to the “feature” branch. If we now activate the “main” branch and run the git merge feature, we will get a merge conflict because the two branches have different opinions about what the line hello again should become. After the merge, should it be XYZ or ABC?
Because Git cannot decide this on its own, we have to manually fix the conflict. Open the index.html file and it will contain the lines coming from both branches. Remove the line not needed, say ABC, and also the lines added by Git (the ones containing <<<<<<, =====, >>>>>>, |||||) for indicating which line belongs to which branch.
Now that the merge conflict is resolved, we need to commit the changes we just did manually:
$ git add .
$ git commit -m “keep the line from the main branch”
We just did what is called a merge commit. Read more.
Deleting a Branch
Now that the work from the “feature” branch is merged, we can delete it by first checking out the “main” branch and then running:
$ git branch -D feature
Running the git branch now will only show a single “main”/”master” branch.
