
Table of Contents
Technology is advancing at a breakneck speed. The process of rapid advancements has reached a level where there is no end in sight.
It all started when the process was confined to the server where HTML pages were delivered to the client-side browser – which ensured the smooth display of web pages to the user.
With time, content became more and more interactive on web pages. What this means is whenever interactive content needs to be displayed, the whole page is re-compiled by the server.
As time passed, websites and their web pages became increasingly complex. This resulted in slow server-side rendering. Due to this issue, the client-side rendering process came to the forefront. It worked differently from server side rendering in a way that now the browser does not need to contact the server.
Instead, the browser can render the HTML page by modifying the Document Object Model (DOM). This process made sure that the complete code can run on the client side.
But there was a problem: for this process to work, a user needed the latest browser and a fast internet connection. Otherwise, that user couldn’t see the content of the web page. At the same time, the content wasn’t SEO friendly at all.
Developers needed a solution. A solution where they could load the page with server-side rendering that could fetch the necessary data instead of re-compiling the whole page.
And finally, that day arrived! Today, it is possible to do server side rendering in React.js – and the SSR has gained traction again!
But before we discuss what is SSR in React using Next.js, let’s first talk about the difference between client-side vs server side rendering.
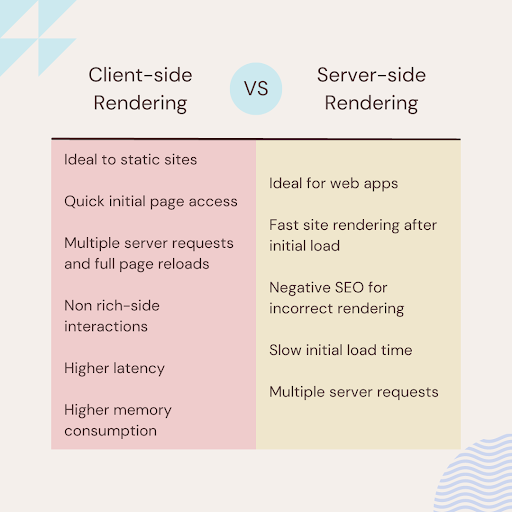
What is Client-Side Rendering?
Client-side rendering came to prominence only after JavaScript libraries started to incorporate them. In simple words, client-side rendering is the rendering of content in the browser using JavaScript.
The process involves an HTML document, with a JavaScript file in the initial loading itself, received that then renders the complete site using the browser. It does it without fetching all the content from the HTML document itself.
The initial loading of the web page is quite slow in client-side rendering. But once it does, the following pages load considerably fast. At the same time, it is not required to reload the entire UI after every request to the server – it updates the UI by re-rendering only that particular DOM element.
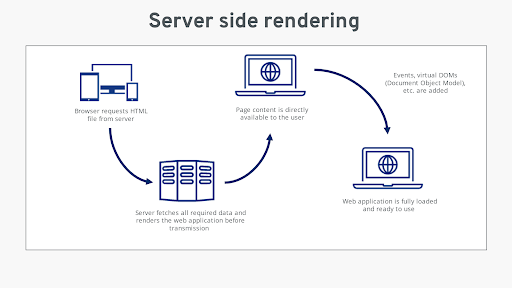
What is Server Side Rendering?
SSR is something that was used popularly in the past before we were introduced to CSR. But the old SSR solution was different. Whenever a user requested a webpage, with PHP for instance, the server used to compile the complete data and content and displayed a fully populated HTML page.
This process worked fast and efficiently until when a user navigated to another route. When navigating to another route, the server had to go through the process all over again; compiling the PHP file, and delivering the HTML, CSS, and JS which delayed the loading of the web page.
A lot of thought was put into the solution to first load the page with server-side rendering and then use a dynamic routing framework to fetch only the necessary data. This is where React stepped in with a solution. This means that for new content browser sends a request through APIs and only new data is fetched.
React popularizes an easy solution: The RenderToString method.
Server Side Rendering in React?
As discussed above, server-side rendering meant that every single web page will be loaded and rendered from the server. However, after React has stepped into the domain, React server side rendering is quite different.
React gives you the best of both worlds; this means that the initial page is rendered from the server and the following pages load from the client, which is only the request of new content.
Advantages of Server Side Rendering in React
There are numerous benefits that you can get from server side rendering in React.
Enhanced SEO:
Everyone wants their pages to appear in Google search results, don’t they?
If you stay informed with the latest Google updates, you’d know that Google can index synchronous JavaScript applications. This gives you enough impetus to have server-side rendered content for Google to crawl.
This is how it is important: The Google crawler only waits for a couple of seconds for loading to complete. So if your app takes time to load and then fetch data via AJAX, then it isn’t good for SEO.
But if you have your pages rendered with server-side technique then Google crawler will have enough time to explore web pages for SEO performance and quickly index them for SEO ranking.
Let’s put it this way: Whenever a search engine like Google visits your website, all it sees is HTML with blank <div id=”app”></div> element. This happens because search engine crawlers only read HTML from the server, not run the application.
This process likely entails that your web page won’t make it to the first few pages of the search results.
Improve Performance:
SSR gives users an improved user experience. It makes the transition between pages and routes seamless after the initial load – the data is sent back and forth with the HTML content holders and not being rendered every single time.
This means that it loads the pages’ content faster and more efficiently. You would have a great user experience despite a poor connection and an older device.
In other words, in server-side rendering, the performance of the application is dependent on the server’s resources and the user’s internet speed. So even if there is a content-heavy website, it’s smooth sailing. React SSR remarkably reduces First User Interaction Time.
For better understanding, let’s see how this process works: the server-side rendering applications break down JavaScript and CSS into smaller chunks, optimize assets, and render pages on the server before putting them in front of the client browser.
Ultimately, this process results in a quicker initial load time.
Disadvantages of Server Side Rendering in React
There are a few disadvantages too of server side rendering.
- Users face increased load time that results in bottlenecks.
- Server-side rendering can be expensive as it needs more resources. This is because all the processing takes place on the server.
- A high number of server requests are needed for complex applications which can slow down the site.
- It increases the complexity of the application.
- Lastly, setting up server-side rendering can be tedious and complicated.
Looking for React Development Team?
Share the details of your request and we will provide you with a full-cycle team under one roof.
How to Implement Server Side Rendering Using Next.js?
Getting Started
You can get started without the frameworks but it is quite difficult as there are numerous considerations and moving parts in the app. This includes minification, bundling, and hot reload.
We recommend that you should pick a framework if you want to render React on the server side. In this article though, we will be discussing how to implement Next.js server-side rendering.
What is Next.js?
Next.js is a framework that provides inbuilt features and functionalities to create React apps with server-side rendering. It has a single command toolchain and a common structure for the front-end development of React apps with zero configuration.
Next.js has a robust community. It handles minification, bundling, and hot reloading for you so you can create pages as React components within files. You’d be surprised to learn that some prominent companies like Netflix and Auth0 use Next.js in production.
Simply put, Next.js is a development framework that simplifies server-side rendering and offers countless features. Here is a glance at some of the major features of Next.js:
- Built-in CSS support
- Pre-rendering pages
- Minimal configuration
- Analytics to measure performance
- Fast refresh with hot code reloading
- Dynamic components
- Automatic image optimization

Basic Configuration of Next.js to Support Server Side Rendering
You would need Node.js installed on your system in order to use Next.js. Once you install that, we are ready to start working with Next.js
We will start by creating a Next app using npx. It is a command that comes with Node.js.
![]()
What this command will do is it will initiate the Next app and create a new folder with the name of the app. Once you do this, all the required packages are downloaded and referenced in package.json. We will now navigate to the application’s root directory and start the npm server. This will immediately run the sample app.
![]()
We now have a basic app structure. Let’s now focus on the pre-rendering and image optimization features of Next.js.
Pre-Rendering
The concept of Pages in Next.js is the building block of applications. The code reaches the browser as a fully formatted HTML document because each page is rendered in advance. This incredibly improves performance and SEO. The generated HTML is linked with minimal JS of that web page that is required by the browser.
Once the HTML is generated, there are two forms of pre-rendering that Next.js can use: Static Generation and Server-side Rendering.
Static Site Generation
Next.js prefer the static generation method for pre-rendering. This way data is fetched and HTML pages are created on build time so that pages can be cached and reused for future requests. You can perform Static Site Generation by exporting an async function getStaticProps
In order to quickly create a Next app, type the following command:
npx create-next-app your-app-name
Now start it in development mode with yarn dev.
Let’s take an example. We will create a file in our /pages folder, named AlbumsListPage.js that we will use to show a list of albums by our favorite musical artists.
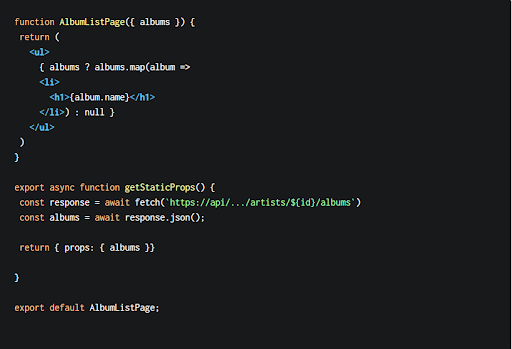
Now you have to make sure of the following:
- getStaticProps must be exported from a component in the ‘/pages’ directory, otherwise, it will not be recognized by Next.js.
- preface getStaticProps with export and async. This function returns an object, which is required to contain a props object which we pass our list of albums
- Lastly, we can then access albums via props
Server Side Rendering
There are cases where data is updated on user request. For instance, on a search where data is updated frequently. This is exactly a situation where SSR is employed to fetch data while still serving a fully up-to-date HTML page.
Here have a look at the code where we export an async function called getServerSideProps:
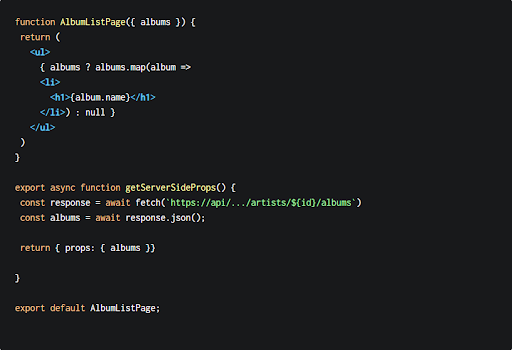
So what’s the difference here? You will notice that on each request for the web page getServerSideProps is called instead of at build time. But this method is slower as compared to static generation but it stands out because it makes sure that you always have up-to-date props.
Conclusion
We recommend that you should pick the Next.js framework that prepares your React app for production at scale.
In a nutshell:
For fetching data when it can be performed before a user’s request Static Site Generation should be your main method. This is because it offers the best performance with cached pages and gives effective SEO for your pages.
At the same time, if the data needs to be fetched at the requested time but still want to pre-render your page’s HTML then Server side Rendering is your best bet. In this case, the performance will be slower than Static Site Generation and may require placeholder elements.
Overall, the Next.js framework gives the liberty to developers to decide on a Page by Page basis which pre-rendering method they’ll like to use; it actually depends on the application’s needs. And not just this, Next.js goes the extra mile by offering image optimization, routing and navigation, analytics, code splitting, and bundling.
