Table of Contents
In this article, we are going to learn how to integrate GrapesJs with Angular Project. To start with, let’s first have a little understanding of GrapesJS.
About GrapesJS:
GrapesJS is an open-source, multi-purpose, Web Builder Framework that is used to speed up the dynamic creation of HTML pages. You can create web pages and templates by just dragging and dropping the blocks from the panel inside the canvas.
Canvas is the place where you create the structure of your templates.
Block in GrapesJS is just a reusable piece of HTML that you can drop into the canvas. A block can be an image, a button, or an entire section with videos, forms, and iframes.
After a block is dropped inside the canvas, you can change different properties for that block and apply custom styles to it. For further details regarding the GrapesJS library and its building blocks, you can check this article: Use grapesjs for building a web builder framework.
Setting up Angular Project:
We will start using GrapesJS by making an Angular Project from scratch. So, first of all, create a new Angular project by executing the below command in the terminal. The project name used is “grapesjs-tutorial”.
ng new grapesjs-tutorial
Now our initial workspace and Angular starter project files have been created. Open the project folder in any editor. Here I will be using GrapesJS by making another angular component although we can initialize the GrapesJS library in the app-root component as well. Let’s now create a new component with the name web-builder by executing the below command in the terminal.
ng generate component web-builder
After that, include the <app-web-builder></app-web-builder> tags in the app.component.html file and delete the rest of the content so that whatever we make in our web-builder component, gets rendered in the DOM.
Installing & Integrating GrapesJS with Angular:
Our component has now been created. Let’s move towards the main part of installing and integrating the GrapesJS library with our Angular Project. Install the GrapesJS library by using the below-mentioned command. After it is successfully installed, you can verify the grapesjs package folder visibility in the node_modules directory, and also there will be an entry in the package.json file.
npm i grapesjs
Now let’s try to include grapesjs in our generated web-builder.component.ts file and initialize it there. You can import grapesjs by using the below statement but it will give you an error similar to this “Could not find a declaration file for module ‘node_modules/grapesjs…’.
import grapesjs from 'grapesjs';
To resolve the mentioned error and for grapesjs to work properly, firstly you need to include the file path of grapesjs in the angular.json file. The code snippet is shown below for reference. The path of the grapesjs CSS file and the js file is added in the styles and scripts array respectively.
                       "assets": [
                           "src/favicon.ico",
                           "src/assets"
                       ],
                       "styles": [
                           "src/styles.css",
                           "./node_modules/grapesjs/dist/css/grapes.min.css"

                       ],
                       "scripts": [
                           "./node_modules/grapesjs/dist/grapes.min.js"
                       ]
                   },
Now, you need to add a new declaration (.d.ts) file at the root of your project to resolve the typescript error. Create a file with the name “grapesjs.d.ts” in your project folder. Add the following statement to this file:
declare module 'grapesjs';
Now you will see the error in the import statement in the web-builder.component.ts file will be resolved.
Let’s move towards initializing the grapesjs editor. You can initialize the editor in the Angular component constructor or in the lifecycle hook methods which Angular provides like ngOnInit or ngAfterViewInit depending on your use case. Here we will be initializing the grapesjs editor in the ngOnInit method. You can check the basic details of initializing the interface for the editor in the official documentation link Getting Started with GrapesJS.
Below is the code snippet for the web-builder.component.ts file for reference.
export class WebBuilderComponent implements OnInit {
 public editor:any = null

 constructor() { }

 ngOnInit(): void {
   this.editor = grapesjs.init({
     // Indicate where to init the editor. You can also pass an HTMLElement
     container: '#gjs',
     // Get the content for the canvas directly from the element
     // As an alternative we could use: `components: '<h1>Hello World Component!</h1>'`,
     fromElement: true,
     // Size of the editor
     height: '700px',
     width: 'auto',
     // Disable the storage manager for the moment
     storageManager: false,
     // Avoid any default panel
     panels: { defaults: [] },
     plugins: [],
   })
 }
}
Add the below code in the web-builder.component.html file.
<div id="gjs">
   <h1>Hello World Component!</h1>
</div>
<div id="blocks"></div>
Add some basic styles in the web-builder.component.css file.
.gjs-cv-canvas {
   top: 0;
   width: 100%;
   height: 100%;
}

.gjs-block {
   width: auto;
   height: auto;
   min-height: auto;
}
Inside the container id, our GrapesJS will be generated. Here, the container id was set as: ‘#gjs’ because we must use the same id that we used in the <div> HTML element. We can now add blocks, panels, and style manager properties manually by referring to the official documentation or we can use a plugin that will give us a lot of useful building blocks that we will be discussing next.
Looking for a Grapesjs Development Team?
Share the details of your request and we will provide you with a full-cycle team under one roof.
GrapesJS Preset Webpage Plugin:
We have set up and initialized the grapesjs, but for now, we will not see any useful building blocks through which we can build our HTML page. So, to get most of the building blocks and their associated style manager properties, we will use a grapesjs plugin with the name “grapesjs-preset-webpage”. The Github link for this plugin is grapesjs-preset-webpage.
Let’s install the package in our project using the below-mentioned command.
npm install grapesjs-preset-webpage
Add the installed package path in the styles and scripts array in the angular.json file.
                       "styles": [
                           "src/styles.css",
                           "./node_modules/grapesjs/dist/css/grapes.min.css",
                           "./node_modules/grapesjs-preset-webpage/dist/grapesjs-preset-webpage.min.css"

                       ],
                       "scripts": [
                           "./node_modules/grapesjs/dist/grapes.min.js",
                           "./node_modules/grapesjs-preset-webpage/dist/grapesjs-preset-webpage.min.js"
                       ]
Now import the package in your web-builder.component.ts file like this:
import 'grapesjs-preset-webpage';
Now include the “gjs-preset-webpage” in the plugins array where you initialized the grapesjs editor.
this.editor = grapesjs.init({
     // Indicate where to init the editor. You can also pass an HTMLElement
     container: '#gjs',
     // Get the content for the canvas directly from the element
     // As an alternative we could use: `components: '<h1>Hello World Component!</h1>'`,
     fromElement: true,
     // Size of the editor
     height: '700px',
     width: 'auto',
     // Disable the storage manager for the moment
     storageManager: false,
     // Avoid any default panel
     panels: { defaults: [] },
     plugins: ['gjs-preset-webpage'],
     pluginsOpts: {
       'gjs-preset-webpage': {
         // options
       }
     },
   })
You can further specify gjs-preset-webpage pluginsOpts and if you want to remove some block from the panel, then exclude it from the block array. For example, here you can test by removing ‘column1’ from the array as shown below in the code and that respective block will no longer be available in the blocks panel. Further plugin options are listed on their repository page.
     plugins: ['gjs-preset-webpage'],
     pluginsOpts: {
       'gjs-preset-webpage': {
         blocksBasicOpts: {
           blocks: ['column2', 'column3', 'column3-7', 'text', 'link', 'image', 'video'],
           flexGrid: 1,
         },
       }
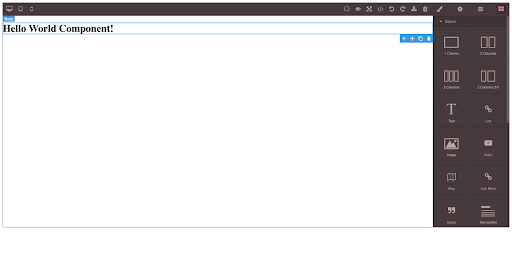
Now run your Angular project with the ng serve command. You will see panels at the top and right from where you can create your templates in the canvas. The below screenshot represents the final output.