Table of Contents
In this article, we are going to learn how Integrating GrapesJS With VueJS works. To start with, let’s first have a little understanding of GrapesJS.
About GrapesJS:
GrapesJS is an open-source, multi-purpose, Web Builder Framework that combines different tools and features with the goal to help you build HTML templates without any knowledge of coding.
Features:
These are some core features provided by GrapesJS.
- Drag and Drop Built-in and Custom Blocks.
- Storage Manager.
- Device Manager.
- Responsive Design.
- Layer Manager.
- Plugins
You can find a complete guide on these features and other important features in this article:
Use GrapesJS For Building Web Builder Framework
Setting Up Vue Project:
We will integrate GrapesJS using Vue.js, first, we need to set up the Vue app. Let’s install vue-cli and create a new Vue app with the app name ‘grapesjs-with-vue’.
- Open the integrated terminal and install the vue-cli. Vue-cli is a command-line helper for generating and managing VueJS applications.
npm install -g @vue-cli
After installation, you can check the vue cli version using the following command.
vue –-version
- Let’s create a Vue app using vue cli by executing this command.
vue create grapesjs-with-vue
It will take some time to complete the installation.
- Change your directory using cd grapesjs-with-vue .
- Start Vue app using npm run serve
Now the Vue app is running on http://localhost:8080/ , make sure this port is free, you will see this view on your browser.

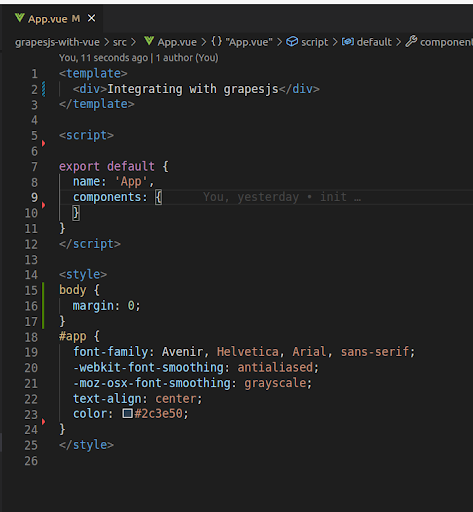
Now remove the default view of the Vue app, by editing App.vue, remove the selected code as shown in the picture below.
src/App.vue contains our root Vue component. Every Vue component has three sections contained in tags.
- <template></template> that contains html of a component.
- <script></script> which contains javascript related code.
- <style></style> which contains css of a component.
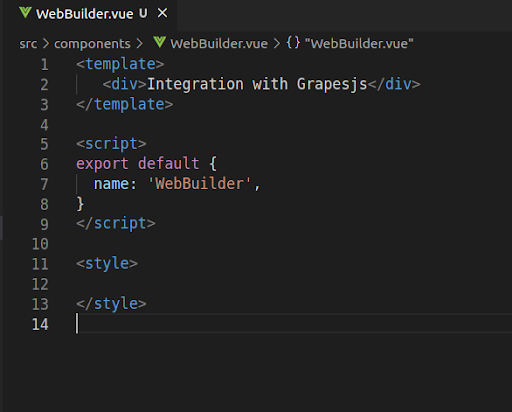
Remove the test component of HelloWorld from src/App.vue. After removing the HelloWorld component code and updating the style it would look like this.
Create a new file with the name of WebBuilder.js in the src/components folder of your vue app and write the required three sections which we discussed above.
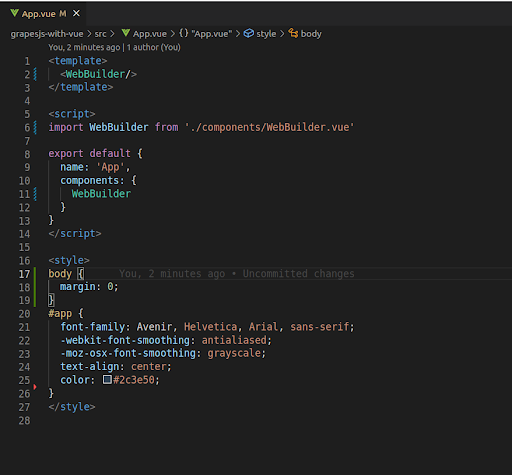
Your WebBuilder component is ready, let’s call it in the App.vue file. You have to import the WebBuilder component and declare our imported component in the component:{} of App component Vue instance and call that component in the template.
Save your files and see the following changes in the browser.

Look for a Grapesjs Development team
Share the details of your request and we will provide you with a full-cycle team under one roof.
Setting Up GrapesJS:
Before starting integration, first, we need to install the required dependencies of GrapesJS, open your app folder in the integrated terminal, and install the following dependencies.
- npm i grapesjs
- npm i grapesjs-preset-webpage
The first one is for the GrapesJS library, and the second one is for the GrapesJS plugin which provides the default building blocks such as buttons, text, and images.
Initialization:
We have installed everything we need, let’s initialize the GrapesJS instance and use that instance to create dynamic templates.
Before initialization, we need to import the required dependencies which we installed before. Let’s update and save the WebBuilder.js file with the following code and see updates in the browser.
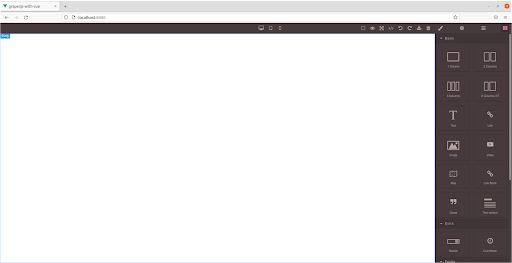
<template>
  <div id="gjs"></div>
</template>

<script>
import grapesjs from 'grapesjs'
import 'grapesjs/dist/css/grapes.min.css'
import 'grapesjs/dist/grapes.min.js'
import 'grapesjs-preset-webpage/dist/grapesjs-preset-webpage.min.css'
import 'grapesjs-preset-webpage/dist/grapesjs-preset-webpage.min.js'
export default {
 name: 'WebBuilder',

 mounted(){
   grapesjs.init({
     container: '#gjs',
     height: '900px',
     width: '100%',
     plugins: ['gjs-preset-webpage'],
     storageManager: {
       id: 'gjs-',
       type: 'local',
       autosave: true,
       storeComponents: true,
       storeStyles: true,
       storeHtml: true,
       storeCss: true,
     },
     deviceManager: {
       devices:
       [
         {
           id: 'desktop',
           name: 'Desktop',
           width: '',
         },
         {
           id: 'tablet',
           name: 'Tablet',
           width: '768px',
           widthMedia: '992px',
         },
         {
           id: 'mobilePortrait',
           name: 'Mobile portrait',
           width: '320px',
           widthMedia: '575px',
         },
       ]
     },
     pluginsOpts: {
       'grapesjs-preset-webpage': {
         blocksBasicOpts: {
           blocks: ['column1', 'column2', 'column3', 'column3-7', 'text',     'link', 'image', 'video'],
           flexGrid: 1,
         },
         blocks: ['link-block', 'quote', 'text-basic'],
       },
     }
   })
 }
}
</script>
<style>
</style>
We used a vue hook mounted that can be used to run code after the component has finished the initial rendering and created the DOM nodes, everything will be inserted inside ‘#gjs’ element. We have plugin arrays where we define our plugins, we can also add other plugins in this array. You can also remove from plugin basic options from the blocks array if you don’t need them. You can use storageManager to save and load your template. We are saving in local storage. You can add new devices and remove existing ones from the deviceManager array.
GrapesJS has loaded its content, check your browser to use its features.