
Table of Contents
It is common to see Angular apps gradually getting slower over time. Even though Angular is a performance framework, apps will start to become slow as they grow if you are not aware of how to develop performant Angular apps. It is, therefore, a must for any serious Angular developer to be aware of what will make an Angular app slow, so they can avoid it becoming slow in the first place and how to optimize angular performance.
In this post we’ll cover the following topics:
OnPush Change Detection Strategy:
Change detection is one of the most common features in Angular frameworks. This is the ability to detect when the user’s data has changed or altered, then update the DOM to reflect the changes. There are two change detection strategies in Angular:
Default Change Detection: Angular detects the changes in the application, within the tree of components. It starts by checking the root component, then its children, then its grandchildren, until all components are checked. Then all the necessary DOM updates are applied in one batch.
But is not a very good idea to check every component on every change. And that’s often not really necessary. Whenever a change occurs, Angular starts checking all components again, starting from the root component and descending to each child component.
OnPush Change Detection: With the OnPush change detection strategy, we can tell Angular not to check each component, every time the change detection runs.
With the OnPush strategy, Angular will check the reference of the objects i.e. reference types and if the reference is the same, no deep comparison is performed.
Suppose we have a parent component and many child components are associated with it. With the Default change detection strategy, if there is any change occurring in the Parent then every child will also detect that change. There may be a lot of data operations on change detection and this can hamper your Angular application. To solve that problem we have onPush strategy, it will say when change detection is asked to check then check for it.
Looking for an Angular development team?
Share the details of your request and we will provide you with a full-cycle team under one roof.
How to use onPush Change Detection?
Let’s create related components in our Angular application named GrandParent, Parent, and child. In parent, we have a method called parent, and same in a child we have a method called the child. In parent HTML we have our child template and we will use interpolation to call the method parent() method. In the child HTML, we will use the interpolation to call the child() method. What will happen here is on every change detection, it will call this method child() and we get logs in our console. In GrandParent, we are using Parent and inside Parent, we are using Child. So these basically have relationships in between. Let’s create an input in GrandParent with ngModel. If there is any change occurring in the input of GrandParent then Parent and Child will also detect it and log the results by using default change detection.
<app-parent></app-parent>
<input [(ngModel)]="title">
grand-parent.component.html
<app-child></app-child>
{{parent()}}
parent.component.html
import { Component, OnInit } from '@angular/core';

@Component({
 selector: 'app-parent',
 templateUrl: './parent.component.html',
 styleUrls: ['./parent.component.css']
})
export class ParentComponent implements OnInit {

 constructor() { }

 ngOnInit(): void {
 }
 parent() {
   console.log('Parent');
   return 'Parent';
 }
}
parent.component.ts
{{child()}}
child.component.html
import { Component, OnInit } from '@angular/core';

@Component({
 selector: 'app-child',
 templateUrl: './child.component.html',
 styleUrls: ['./child.component.css']
})
export class ChildComponent implements OnInit {

 constructor() { }
 ngOnInit(): void {
 }
 child() {
   console.log('child');
   return 'child';
 }
}
Child.component.ts
Let’s run the application and see what happens. As you can see we are getting all our parent, and child components and all our changes have been run.
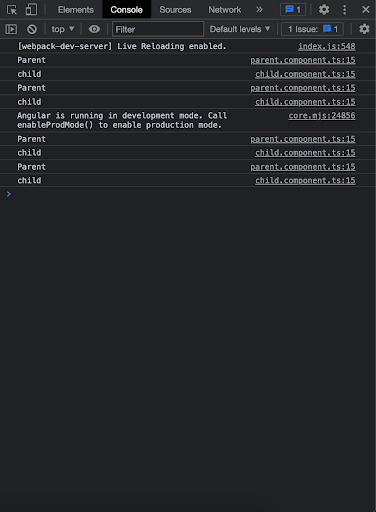
Let’s change the input value of GrandParent, it will trigger Parent and child on console as follows:

As you can see if I change in GranParent, only the Parent component will rerender.

Add change detection strategy onPush to the Parent component as well. On initial rendering, both components will render.
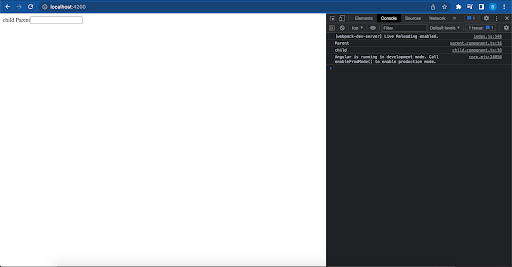
When I change the input of GrandParent there will be no change detected by Parent and Child because now they are using onPush strategy.

Why and When to Use trackBy Attribute with ngFor Directive?
Unfortunately, the default method of identifying objects by reference is quite constrained especially in circumstances where a reference shift can’t be prevented.
For example, in scenarios when we’re working with a REST-API or using immutable data structures, the reference of each object keeps changing all the time.
This causes angular to surrender all optimization causing it to re-render the whole list. This is because every reference is modified and therefore every object seems new to angular. This can have a major impact on performance, particularly for big collections.
To avoid this, we can help Angular identify each object in the collection by having a trackBy attribute.
A trackBy attribute allows us to define a function that returns a unique identifier for each iterable element. This helps bypass unnecessary and expensive comparisons when the data list changes, say for example on receiving new data from an API call.
Hence, Angular will identify elements by this unique identifier as this value does (should) not change when the reference changes, and angular can apply the optimization.
The trackby function takes the index and the current element as arguments and it returns the unique identifier for this element.
Here is an example:
array = [
   {
     hash: '14u0ea57-dh58–92bc-befe6-j8c4xsj410fb7',
     id: 1368,
     name: 'Robert De-Niro',
   },
   {
     hash: 'sj4i43n3–3ndj-3hcd-sj47-xdchjhrf74315f',
     id: 1469,
     name: 'Al-Pachino',
   },
   {
     hash: '9338bdjc-dh47–39hd-b6a6n-snbjsbdjw7',
     id: 2830,
     name: 'Martin Scorcesse',
   },
   {
     hash: '39dbjsd-du38–43dd-39dcbd-38bcdjncjjd',
     id: 1742,
     name: 'Terence Malik',
   },
 ];
 trackFunction(index: number, element: any) {
   return element ? element.hash : null;
 }
In our example, the unique identifier for identification will be the hash of the element. But it could also be any key that is going to be specific to that object.
We must also inform the ngFor Directive which function it should use to identify the item of the collection.
This looks what that looks like:
<ul>
   <li *ngFor="let element of array; trackBy: trackFunction">
       {{element.name}}
   </li>
</ul>
Ahead-of-Time (AOT) Compilation:
Angular offers two types of compilation.
-
Just in Time (JIT) Compilation
JIT compilation is the default when you run the build-only or the build-and-serve-locally CLI commands.
ng serve
ng build
-
Ahead of Time (AOT) compilation
This type of compilation is by default set in the Angular 9+ project. For AOT compilation appending – -aot flag is required.
ng build –aot
How AOT Works
Angular Ivy is the new compilation and rendering pipeline in Angular version 9 and newer. Angular Ivy is super-fast and efficient compared to its predecessor View Engine.
The main things that will happen during the compilation are tree-shaking, bundling, uglification, and minification of code. In addition, the compiler removes Angular-specific decorators, constructor parameters, and unused code.
The compilation happens in three main phases, as follows:
-
Code analysis
This is where the compiler analyses Angular-specific metadata such as @Component() and @Input(). The metadata is what gives Angular the required info that it uses to construct instances of the application, for example, how to create a component and produce a visual representation of it. Angular represents the overall structure of decorator metadata inside .metadata.JSON files.
Metadata syntax violation errors are also detected and recorded in this phase.
One of the main outputs of the code analysis phase is type definition files, which have the extension .d.ts. The AOT compiler uses these files to generate application code. A sample .d.ts file looks as follows.
export declare enum EntityActions {
   Set = "Set",
   Add = "Add",
   Update = "Update",
   Remove = "Remove"
}

export interface WntityActions<IDType> {
   type: EntityActions;
   ids: IDType[];
}
-
Code generation
During the second phase of compilation, the compiler will interpret the output of the .metadata.json files produced in phase one above. It will also check if the semantics of the metadata are compliant with compiler rules.
Metadata rewriting is another critical step that happens in this phase. For example, if arrow functions are found in metadata expressions, the code generation phase will rewrite that function into a form that is more friendly to the compiler.
-
Template type checking
The final phase of the compilation has a lot to do with Angular templates, i.e., the files that hold HTML code. In this phase, the compiler will type-check expressions so that they do not cause crashes at runtime.
The Angular compiler also makes use of the TypeScript compiler to validate binding expressions in templates. When type errors are detected, the template validation produces appropriate error messages.
Note: With Angular Ivy, the template checker is a bit stricter than its predecessor View Engine. As a result, some templates with type-checking errors that compile in View Engine may not do so in Angular Ivy.
Remove Unused Code Using Tree-Shaking:
Tree-shaking is a dead-code elimination technique used for optimizing codes in Javascript. You can use Tree-shaking for removing the unwanted code. It will help you in getting the smaller build size as much as possible. However, it is, by default, enabled when you use Angular CLI. It removes the unused modules at the build time, so it can also be referred to as dead code elimination.
Angular Tree Shakeable Providers:
We can register our services with a different mechanism using Angular Tree Shakeable Providers (TSP). The new TSP syntax looks like this.
import { Injectable } from '@angular/core';

@Injectable({
 providedIn: 'root'
})
export class myService {

 constructor() { }
}
You can see in the code snippet above in the @Injectable decorator, that we now have a new property providedIn. With this property, we tell Angular which module to register our service in, instead of registering it in the @NgModule.
By default, TSP will register our service to the Root injector which makes it available as a Singleton Service. With TSP new syntax, we are not using the import statement in the AppModule and it’s working directly by using providersIn hence Angular will make sure that this service will only be included in our bundle if it is imported into the components.
In order to illustrate this, let’s look at an example. In this example app, we will be using two components and two services, one with explicit dependency injection in NgModule and another with TreeShakeable Service Provider.
import { Injectable } from '@angular/core';

@Injectable()
export class SimpleService {

 constructor() { }
 public methodCall(): void {
   console.log('Hi!  this is a method call from service');
 }
}
This is a simple service that is created with a simple @Injectable decorator and in order for this service to work, we will import it into our AppModule like so.
import { NgModule } from '@angular/core';
import { BrowserModule } from '@angular/platform-browser';

import { AppRoutingModule } from './app-routing.module';
import { AppComponent } from './app.component';
import { ParentComponent } from './parent/parent.component';
import { ChildComponent } from './child/child.component';
import { GrandParentComponent } from './grand-parent/grand-parent.component';
import { FormsModule } from '@angular/forms';
import { TrackByComponent } from './track-by/track-by.component';
import { SimpleService } from './simple.service';

@NgModule({
 declarations: [
   AppComponent,
   ParentComponent,
   ChildComponent,
   GrandParentComponent,
   TrackByComponent
 ],
imports: [
   BrowserModule,
   AppRoutingModule,
   FormsModule
 ],
 providers: [SimpleService],
 bootstrap: [AppComponent]
})
export class AppModule { }
In the above code, we have included our service in the AppModule and this will now be injected in our component to work.
import { Component, OnInit } from '@angular/core';
import { SimpleService } from '../simple.service';

@Component({
 selector: 'app-grand-parent',
 templateUrl: './grand-parent.component.html',
 styleUrls: ['./grand-parent.component.css']
})
export class GrandParentComponent implements OnInit {
 title: string = '';
 constructor(public simpleService: SimpleService,) { }

 ngOnInit(): void {
   console.log('ng on init comp1');
    this.simpleService.methodCall();
 }
}
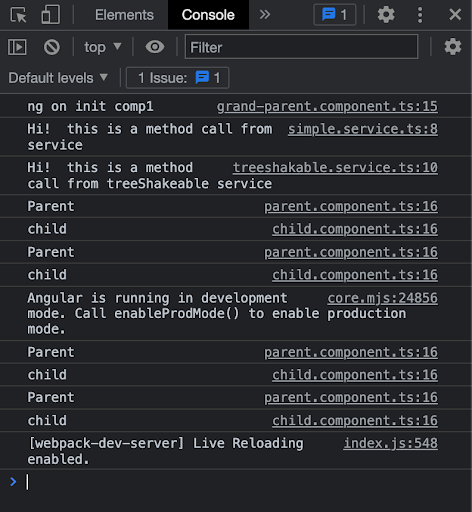
If we inspect the console, we will see the message printed successfully.

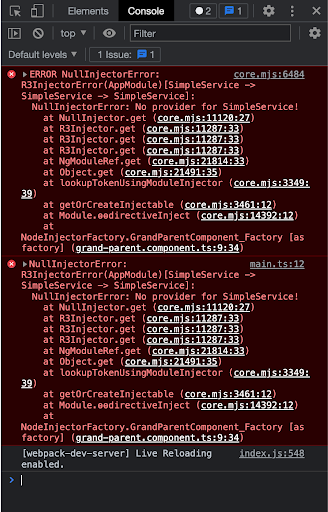
Let’s now go to our AppModule and remove our service from the providers’ array in the decorator. Immediately after you remove the service from providers, it will throw a static Injector error because our service is not registered in the Dependency Injector service.
Now for the main event! let’s create our tree shakeable service using Tree Shakeable Providers API. Create a new service call treeshakeable and add the new @injector decorator syntax.
import { Injectable } from '@angular/core';

@Injectable({
 providedIn: 'root'
})
export class TreeshakableService {

 constructor() { }
}
After adding providerIn , our service is now ready to be injected and used without being added to providers. Now inject it into the constructor of component2 and call the method. Finally, look at the console, we see the following message:
We have successfully created a Treeshakeable Service. What does this mean for us? Well, our previous service used the old Service provider API to explicitly inject dependency which made it dependent on the import statement, and since we need to perform tree shaking, the import statement made it impossible to determine whether the services are being used or not, and hence they were all included in the build. Now with the new Service Provider API implemented, our services will only be included if and only if they are used imported via the import statement in the components.
By utilizing the Tree Shaking technique, we can reduce the bundle size of our application and in turn optimize the performance of our Application. The new versions of Angular now create services with tree shakeable providers API so you won’t have to make much effort there.
Preload and Prefetch for Instant Engagement:
Preload is used when you want to load the initial content of a web page, at the time of loading a website. Prefetch is used for loading the required content once the website is already loaded on the browser. These attributes are used for loading static resources. It is important to attend to the users waiting for the site to load with some instant content instead of a blank page. These attributes do a nice job of loading the essential content as quickly as possible.
DNS-Prefetch:
A dns-prefetch tells the browser that we would need a few resources from a particular URL, and the browser can start the DNS resolution as quickly as possible. Let’s look at the code.
<link rel=”dns-prefetch” href=”//soorajchandran.me”>
Assume that we would be redirected to soorajchandran.me at some point of the user journey. We can add the above line in the head section of our code. Once the browser completes parsing the document, it starts with the DNS resolution for soorajchandran.me. Thus the further requests to soorajchandran.me for resources become slightly faster.
You can see it here in the code example. Using a DNS-prefetch can save a lot of time with redirects and on mobile devices where internet speed might be less.
Preload:
Let’s also take a quick look at preload, although this doesn’t fall under the prefetching techniques. ( No strict separation exists )
preload is a relatively newer web standard that allows preloading resources.
Take a look at the below code example:
<link rel=”preload” href=”https://fonts.googleapis.com/css?family=Roboto” as=”font”>
Assume that we use, Roboto font at someplace on our webpage, and the font is loaded from a CSS file. Normally a browser would only load files that are referred to by the HTML document. preload lets us load the resources that are initiated via CSS or JavaScript.
Let’s also have a look at a few tools that might come in handy when you are building a cutting-edge web application that requires top-notch performance tuning.
The most common use cases of implementing prefetching techniques are in progressive web apps where performance matters a lot and mobile devices where internet speed can vary. Rendering important parts of the page in a sensible manner can also help make the user experience better, thereby increasing the conversion and engagement rates.
Conclusion:
In this post, we saw how to performance tune your Angular app. Developing an Angular application is an easy task. The challenging task is to optimize its performance for a great end-user experience. Although there are many ways of improving the performance of an application, incorporating some of the important optimization techniques inside your application can really help in optimizing and fine-tuning your Angular apps.
You can find the full example on Github.
