
Table of Contents
Two-Factor/Multi-Factor Authentication: The Complete Front-End and Back-End Guide Using the MERN Stack and Google Authenticator
Two-Factor Authentication (2FA), also called Multi-Factor Authentication (MFA), is an open-source standard that greatly enhances user security while being pretty straightforward to implement. Many of the world’s top websites employ this simple yet powerful security measure when logging in to their users.
How Does it Work?
In addition to the usual ID and password pair, you are required to provide an additional secret code, usually 6-digits, to login which you obtain from an authenticator application (e.g. Google Authenticator or this Chrome extension) installed in your phone or web browser which you have registered with the platform or website you are logging into by simply scanning a QR code. After the initial registration step, the authenticator app doesn’t even need to be online to give you the required secret OTP. Magic! Right?
As it is with all things in computer science, it turns out it is not magic, rather it is only some solid logic. At the heart of 2FA/MFA, the kind we are going to implement, are two cryptographic algorithms. The first algorithm when simplified takes as input three things:
- The current approximate time on the clock
- A user-specific secret key
- And an OTP usually consists of 6 digits
Its output is a simple yes or no specifying the validity of the input triplet. The second algorithm is similar to the first one except that instead of taking an OTP as the third input, it spits one out.
Thus, by having a server and a client which share the clock and a secret, the client’s claim of possessing the secret previously shared by the server can be verified without actually sharing the secret. This secret can then be used for user authentication.
Prerequisites For This Tutorial
Before starting, make sure you have a recent version of the following installed and set up:
If you have anything missing, there are excellent tutorials for just about everything on the interwebs (just like this one!) so we are not going to delve into it. After you have all the prerequisites satisfied, continue ahead.
So Let’s Start!
Begin by creating a new empty directory called 2fa which will hold the code for both our Express backend and React frontend. We will start with the backend and test it with Postman as we go. Create another directory called backend inside 2fa and run this in it:
npm init -y
This will initialize the project by creating a brand new package.json file in the project root with default values. Next, install the packages we will be using:
npm install bcrypt cors express jsonwebtoken mongoose otplib passport passport-jwt passport-local qrcode
All these packages will be installed in the project’s newly created node_modules folder which you can inspect with your file explorer if you are curious. Now create and open a file called index.js in the project root which will be the entry point for our code and put this in it:
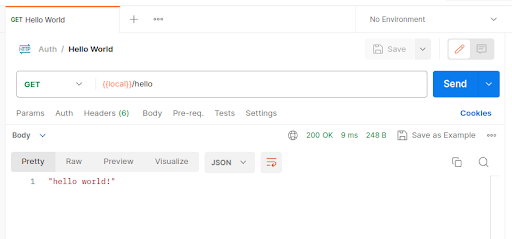
const express = require("express");

const PORT = 9001;
const app = express();

app.get(
  "/hello", (req, res) => {
    res.json('hello world!')
  }
);

app.listen(PORT, () =>
  console.log(`Express started on http://localhost:${PORT}`)
);
And then run it with:
node index.js
This will create and start a basic Express server which you can test by going to http://localhost:9001/hello in your browser. While this is nice, we will soon want more control over making requests to our server and for this purpose we will start using Postman from the get-go:
Delete the sole app.get() call in index.js because it was only for demonstration. Let’s go ahead and make a dedicated controllers.js file for our controllers and put the following code in it:
const signup = async (req, res) => {
  return res.status(201).json({
    message: "Signup successful",
    user: req.user,
  });
};

module.exports = {
  signup,
};
We need to wire this controller in our routes for it to actually do anything. Modify the index.js file so that it looks like this:
const cors = require("cors");
const express = require("express");
const controllers = require("./controllers")

const PORT = 9001;
const app = express();

app.use(express.json());

app.use("/api", cors());

app.post(
  "/api/signup",
  controllers.signup
);

app.listen(PORT, () =>
  console.log(`Express started on http://localhost:${PORT}`)
);
Restart the server and use Postman to test the new endpoint:
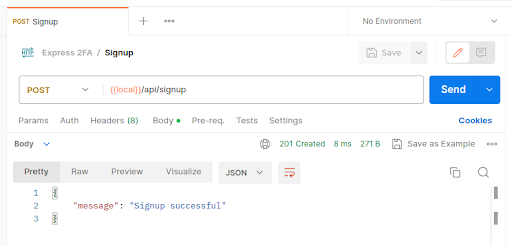
We haven’t written the logic to actually create a new user just yet and we also used a req.user object in our signup controller which is not showing up in the response to our request in Postman. Let’s remedy this by first writing the database setup code and then the logic to create a new user in the database. Finally, we will put everything together so that our signup endpoint actually signs up a new user.
Create db.js with this in it:
const mongoose = require("mongoose");

mongoose.connect("mongodb://127.0.0.1:27017/2fa");

const db = mongoose.connection;

db.on("error", (err) => {
  console.error(`MongoDB Error: ${err.message}`);
  process.exit(1);
});

db.once("open", () => {
  console.log("MongoDB connection successful");
});

require("./models");
This will set up and establish our connection with MongoDB. Next, create the missing models.js file which we are importing above at the end:
const mongoose = require("mongoose");
const bcrypt = require("bcrypt");

const UserSchema = new mongoose.Schema({
  email: {
    type: String,
    required: true,
    unique: true,
  },
  password: {
    type: String,
    required: true,
  },
  age: {
    type: Number,
    required: true,
  },
  twofaEnabled: {
    type: Boolean,
    default: false,
  },
  twofaSecret: {
    type: String,
    default: "",
  },
});

UserSchema.methods.verifyPassword = async function (password) {
  return await bcrypt.compare(password, this.password);
};

const UserModel = mongoose.model("user", UserSchema);

module.exports = { UserModel };
We use mongoose to simplify our interaction with MongoDB. UserSchema contains all the necessary fields we will need to make a functioning example, one of which is optional and represents any extra data we would want to attach to a user; the age field. Other such fields can be added or removed as required. We also define a method on the schema to compare passwords.
Next up, we will write the logic to create a new user, and create auth.js with this in it:
const passport = require("passport");
const extractJwt = require("passport-jwt").ExtractJwt;
const jwtStrategy = require("passport-jwt").Strategy;
const localStrategy = require("passport-local").Strategy;
const { UserModel } = require("./models");
const env = require("./env");
const bcrypt = require("bcrypt");

passport.use(
  "signup",
  new localStrategy(
    {
      usernameField: "email",
      passwordField: "password",
      passReqToCallback: true,
    },
    async (req, email, password, done) => {
      try {
        if (await UserModel.findOne({ email })) {
          return done(null, false, {
            message: `User with email ${email} already exists`,
          });
        }

        const hashedPassword = await bcrypt.hash(password, 10);

        const user = await UserModel.create({
          email,
          password: hashedPassword,
          age: req.body.age,
        });

        return done(null, {
          email: user.email,
          age: user.age,
        });
      } catch (error) {
        return done(error);
      }
    }
  )
);
We are creating a middleware using passport which checks if a user with the requested email already exists, if not then it goes ahead and creates the user with the password hashed with a randomly generated salt. This is what adds the .user attribute to the req object in the signup controller. Don’t mind the extra imports up top, we will use them shortly. For now, we are missing an environment file that holds sensitive server configuration. Create env.js with the following content:
module.exports = {
  JWT_SECRET: "YOUR_TOP_SECRET_KEY_HERE",
};
Now we need to use this newly created middleware with our signup controller. Edit index.js and add passport.authenticate(“signup”, { session: false }) as the second argument to the app.post() call so that it starts acting as a middleware for just the signup controller. It will look like this:
...
const passport = require("passport");
const db = require("./db");
const auth = require("./auth");
...
app.post(
  "/api/signup",
  passport.authenticate("signup", { session: false }),
  controllers.signup
);
...
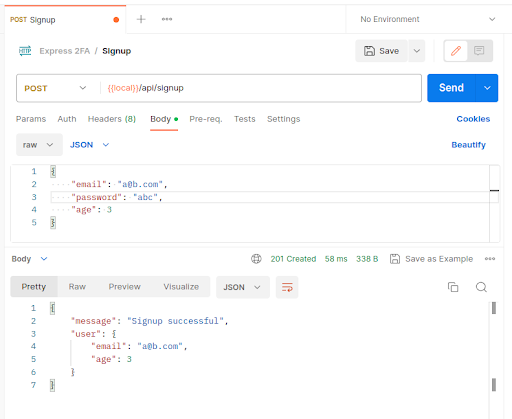
The signup endpoint is now complete and can be tested with Postman after restarting the server:
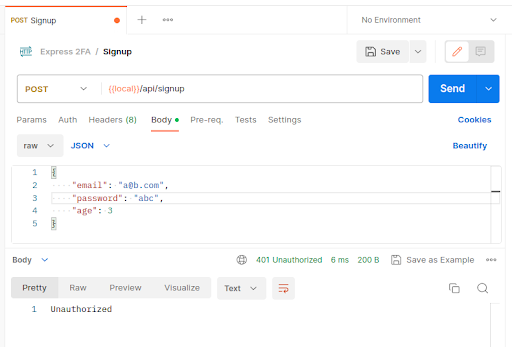
Note that signing up with the same email again will not work:
Let’s create the login endpoint now. Edit controllers.js:
const qrcode = require("qrcode");
const jwt = require("jsonwebtoken");
const passport = require("passport");
const { authenticator } = require("otplib");
const env = require("./env");
const { UserModel } = require("./models.js");

...

const login = async (req, res, next) => {
  passport.authenticate(
    "login",
    { session: false },
    async (err, user, info) => {
      if (err || !user) {
        return res.status(401).json({
          message: "Invalid email or password",
        });
      }

      if (!user.twofaEnabled) {
        return res.json({\
          message: "Login successful",
          twofaEnabled: false,
          token: jwt.sign(
            {
              user: { email: user.email },
            },
            env.JWT_SECRET
          ),
        });
      } else {
        return res.json({
          message: "Please complete 2-factor authentication",
          twofaEnabled: true,
          loginStep2VerificationToken: jwt.sign(
            {
              // important to keep this payload different from a real/proper
              // authentication token payload so that this token cannot be used
              // for real/proper authentication defeating the whole point of
              // 2-factor authentication
              loginStep2Verification: { email: user.email },
            },
            env.JWT_SECRET,
            { expiresIn: "5m" }
          ),
        });
      }
    }
  )(req, res, next);
};

module.exports = {
  ...
  login,
};
This controller receives a user object in the parameters which is supplied by the login passport middleware. It returns a matching response on an invalid email or password. If the email and password are valid, it returns the final authentication JWT if Two-Factor Authentication is not enabled, and if it is enabled, it returns an intermediate step-2 JWT which is required for verifying that we are coming to login step-2 after having completed the login step-1 properly, it does not function as the final authentication JWT.
Create the missing login passport middleware at the end of auth.js:
passport.use(
  "login",
  new localStrategy(
    {
      usernameField: "email",
      passwordField: "password",
      passReqToCallback: true,
    },
    async (req, email, password, done) => {
      try {
        const user = await UserModel.findOne({ email });

        if (!user) {
          return done(null, false, {
            message: "Invalid email or password",
          });
        }

        const validate = await user.verifyPassword(password);

        if (!validate) {
          return done(null, false, {
            message: "Invalid email or password",
          });
        }

        return done(null, user, {
          message: "Logged in successfully",
        });
      } catch (error) {
        return done(error);
      }
    }
  )
);
Now simply use the login controller in a route in index.js just like before:
...
app.post("/api/login", controllers.login);
...
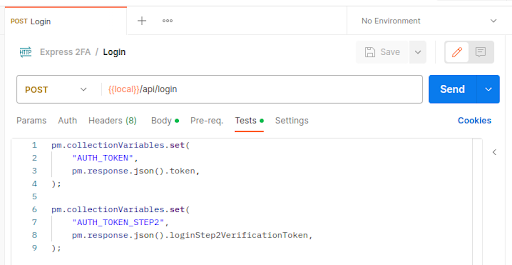
The login endpoint is now complete. Test in Postman:

Note that this is the response only when 2FA is not enabled. We will later look at a different response when 2FA is enabled. Also, note that this Postman collection has been configured to automatically extract the tokens in this response into their own collection variables which can then be easily used in other Postman requests:
Now that we are successfully generating valid authentication JWTs, let’s use them to make a protected /api/profile route that only logged-in users can access. As you can guess, we will be making another passport middleware. This one will check that the JWT coming with the request has been in fact generated with our JWT_SECRET i.e. that it is valid. If yes, it will attach a .user object with the req objects of controllers configured to use this middleware based on the email within the JWT payload. Append this to auth.js:
passport.use(
  "jwt",
  new jwtStrategy(
    {
      secretOrKey: env.JWT_SECRET,
      jwtFromRequest: extractJwt.fromAuthHeaderAsBearerToken(),
    },
    async (token, done) => {
      try {
        const user = await UserModel.findOne({
          email: token.user?.email,
        });
        return done(null, {
          email: user.email,
          age: user.age,
          twofaEnabled: user.twofaEnabled,
        });
      } catch (error) {
        return done(error);
      }
    }
  )
);
Next, create the profile controller in controllers.js:
const profile = async (req, res) => {
  return res.json({
    message: "Success",
    user: req.user,
  });
};

module.exports = {
  ...
  profile,
};
And add the profile route in index.js:
...
app.get(
  "/api/profile",
  passport.authenticate("jwt", { session: false }),
  controllers.profile
);
...
The protected profile endpoint is now complete. Test in Postman after restarting the server:
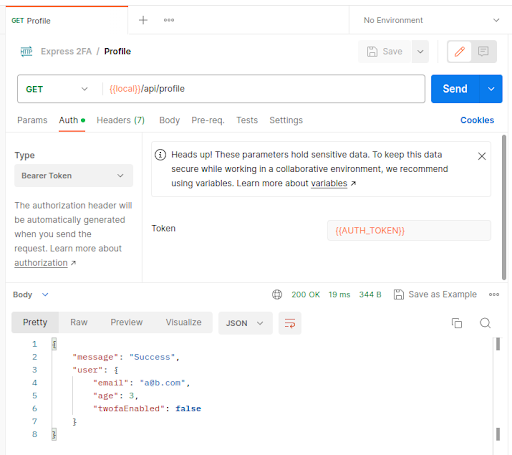
Try replacing {{AUTH_TOKEN}} with an invalid JWT and you will be told you are not authorized to use this endpoint.
Next up, we will write the two endpoints to enable 2FA for a user. The first endpoint /api/generate-2fa-secret will generate and store a 2FA secret for a user. The second endpoint /api/verify-otp will verify that the user can successfully generate valid OTPs based on the given 2FA secret (using an authenticator app) and then enable 2FA for the user. Both of these endpoints will be protected i.e. only a logged-in user with a valid authentication JWT will be able to use them. In controllers.js, add the following code:
const generate2faSecret = async (req, res) => {
  const user = await UserModel.findOne({ email: req.user.email });

  if (user.twofaEnabled) {
    return res.status(400).json({
      message: "2FA already verified and enabled",
      twofaEnabled: user.twofaEnabled,
    });
  }

  const secret = authenticator.generateSecret();
  user.twofaSecret = secret;
  user.save();
  const appName = "Express 2FA Demo";

  return res.json({
    message: "2FA secret generation successful",
    secret: secret,
    qrImageDataUrl: await qrcode.toDataURL(
      authenticator.keyuri(req.user.email, appName, secret)
    ),
    twofaEnabled: user.twofaEnabled,
  });
};

const verifyOtp = async (req, res) => {
  const user = await UserModel.findOne({ email: req.user.email });
  if (user.twofaEnabled) {
    return res.json({
      message: "2FA already verified and enabled",
      twofaEnabled: user.twofaEnabled,
    });
  }

  const token = req.body.token.replaceAll(" ", "");
  if (!authenticator.check(token, user.twofaSecret)) {
    return res.status(400).json({
      message: "OTP verification failed: Invalid token",
      twofaEnabled: user.twofaEnabled,
    });
  } else {
    user.twofaEnabled = true;
    user.save();

    return res.json({
      message: "OTP verification successful",
      twofaEnabled: user.twofaEnabled,
    });
  }
};

module.exports = {
  ...
  generate2faSecret,
  verifyOtp,
};
And then connect them with their routes in index.js:
...
app.post(
  "/api/generate-2fa-secret",
  passport.authenticate("jwt", { session: false }),
  controllers.generate2faSecret
);

app.post(
  "/api/verify-otp",
  passport.authenticate("jwt", { session: false }),
  controllers.verifyOtp
);
...
These two endpoints are now complete. Test them in Postman after restarting the server:
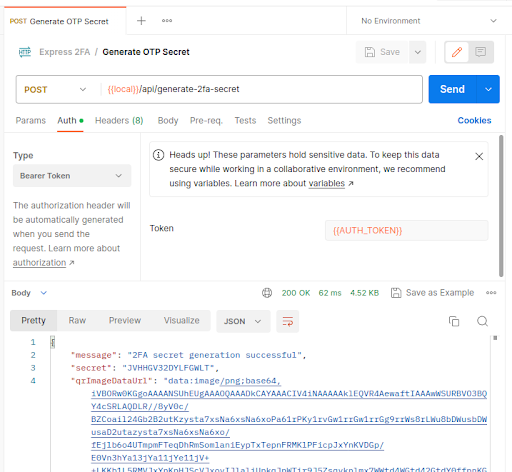
Now, either input the secret manually in Google Authenticator or display the QR code image data and scan it. Let’s go with scanning. Copy the whole super long string start to end in the above response and put it in a new file called qr.html like this:
<img src="data:image/png;base64,iVBORw0KGgoAAAA...TAAAAAElFTkSuQmCC"/>
Now open this file in a browser and you will see a QR code. Scan this QR code with Google Authenticator and voila! You will start seeing your 2FA OTPs. Alternatively, a short script of our own can be written to do the same job, create generateAuthenticator2faTokenFromSecret.js:
const authenticator = require("otplib").authenticator;

const SECRET = process.argv[2];

async function main() {
  while (true) {
    const d = new Date();

    process.stdout.write(
      "\u001b[2K\u001b[0G" + // ANSI escape sequences to clear line and move cursor to line start
        `Secret: ${SECRET}` +
        ` | OTP: ${authenticator.generate(SECRET)}` +
        ` | OTP expires in: ${authenticator.timeRemaining()}s` +
        ` | Current Time: ${d.getHours()}h:${d.getMinutes()}m:${d.getSeconds()}s`
    );

    // sleep for 1000ms
    await new Promise((r) => setTimeout(r, 1_000));
  }
}

main();
Run it with:
node generateAuthenticator2faTokenFromSecret.js "<YOUR-2FA-SECRET>"
Any way you obtain the OTP, it’s not done yet. We still have to verify an OTP once to properly enable 2FA for our user:
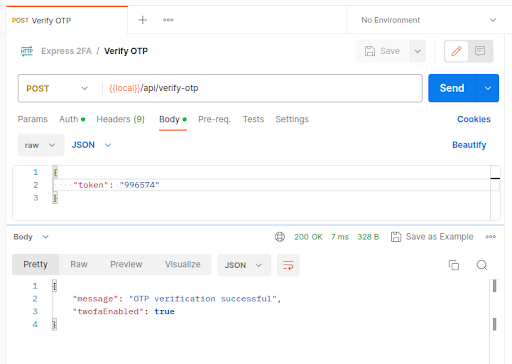
After making the request above with the correct time-sensitive OTP, 2FA will be enabled for our user. Our existing authentication JWT will remain valid though. But if we visit the login endpoint now with the same credentials as before, we see this:

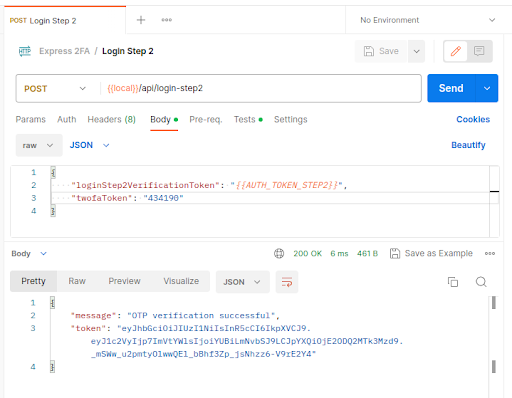
Let’s create the login step-2 endpoint now. Make a new controller which will return final authentication JWTs given a valid pair of an intermediate step-2 verification token and a 2FA OTP:
const loginStep2 = async (req, res) => {
  let loginStep2VerificationToken = null;
  try {
    loginStep2VerificationToken = jwt.verify(
      req.body.loginStep2VerificationToken,
      env.JWT_SECRET
    );
  } catch (err) {
    return res.status(401).json({
      message: "You are not authorized to perform login step-2",
    });
  }

  const token = req.body.twofaToken.replaceAll(" ", "");
  const user = await UserModel.findOne({
    email: loginStep2VerificationToken.loginStep2Verification.email,
  });
  if (!authenticator.check(token, user.twofaSecret)) {
    return res.status(400).json({
      message: "OTP verification failed: Invalid token",
    });
  } else {
    return res.json({
      message: "OTP verification successful",
      token: jwt.sign(
        {
          user: { email: user.email },
        },
        env.JWT_SECRET
      ),
    });
  }
};

module.exports = {
  ...
  loginStep2,
};
Add it to the routes in index.js:
...
app.post("/api/login-step2", controllers.loginStep2);
...
The login step-2 endpoint is now complete. Restart the server and then in Postman, hit the login step-1 endpoint to obtain the intermediate JWT and then hit the login step-2 endpoint:
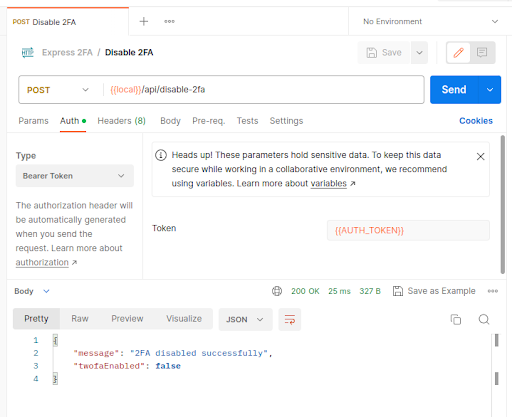
Our backend is now almost complete, now we just need a way to disable 2FA for a user, which turns out to be rather simple. In controllers.js:
const disable2fa = async (req, res) => {
  const user = await UserModel.findOne({ email: req.user.email });
  user.twofaEnabled = false;
  user.twofaSecret = "";
  await user.save();

  return res.json({
    message: "2FA disabled successfully",
    twofaEnabled: user.twofaEnabled,
  });
};

module.exports = {
  ...
  disable2fa,
};
And in index.js:
app.post(
  "/api/disable-2fa",
  passport.authenticate("jwt", { session: false }),
  controllers.disable2fa
);
Our backend is now complete, restart the server and try the endpoint in Postman:
The complete code for the backend is available here.
On to The Front-End…
Coming soon
